How to create an Image Gallery Popup
What is an Image Gallery Popup?
An Image Gallery Popup is a dynamic overlay that displays multiple images in a lightbox-style format. Instead of navigating to a new page, visitors can view, navigate, and interact with your gallery directly within a popup window. It enhances user engagement, improves content presentation, and keeps visitors on the same page.
Note: The Image Gallery Popup feature is available through a Premium Extension of Instant Popup Builder.
You may also need to check: How to Install a Single Extension? & How to Activate Your License Key?
Prerequisites
Make sure the Image Gallery Popup extension is installed and activated in your WordPress setup.
Creating an Image Gallery Popup allows you to display a set of images in an attractive, interactive format that overlays the content on your page. This improves user engagement and helps showcase products, events, portfolios, or any visual content without redirecting users to another page.
This guide will walk you through every step of creating, configuring, and publishing a high-performance, fully responsive image gallery popup using the Instant Popup Builder.
Step 1: Access the Instant Popup Builder
To begin, log into your WordPress admin panel and follow these steps:
- Navigate to
Instant Popup Builderfrom the WordPress admin sidebar. - Click the “Create New Popup” button.
- When prompted to choose a popup type, select “Image Gallery”.
Tip: If “Image Gallery” does not appear, ensure the Image Gallery extension is installed and activated, and the license key is valid.
Step 2: Basic Setup – Title and Image Upload
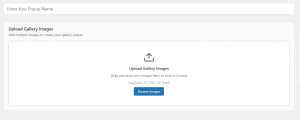
Name Your Gallery Popup
- Give your popup a clear and descriptive name.
- Example:
"Spring Collection Lookbook"or"Event Highlights – June 2025".
Why it’s important: A good title helps you organize and manage multiple popups from the dashboard.
Upload Images
You have two options to add images to your image gallery popup:
- Drag & Drop: Drag images directly from your computer into the upload area.
- Browse Library: Click “Browse” to select from the WordPress Media Library or upload new files.
Supported Image Formats:
- JPG / JPEG
- PNG
- GIF (for animated galleries)
- WebP (recommended for performance)
Recommended Image Sizes:
- Minimum: 800×600 px
- Ideal: Use optimized images under 300 KB for faster load times
Performance Tip: Compress your images using tools like TinyPNG or Squoosh before uploading.
Step 3: Organize and Edit Gallery Images
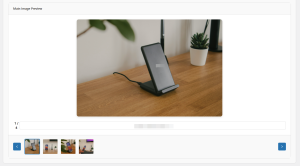
Once your images are uploaded, you’ll see a gallery grid inside the popup editor.
Reordering Images
- Click and drag images to rearrange them.
- The first image will be displayed first when the popup opens.
Editing Captions and Metadata
- Click on an image to open the details panel:
- Caption: Appears under the image.
- Alt Text: Important for SEO and accessibility.
- Image Title: Optional, may show on hover.
Deleting Images
- Hover over any image.
- Click the red X icon to remove it from the gallery.
Step 4: Configure Popup Settings
The Image Gallery Popup includes several settings tabs to control how it looks, when it appears, and how it behaves. Below are the key configuration options
Gallery-Specific Settings
Once you’ve uploaded and organized your images, it’s time to customize how your Image Gallery Popup will function and appear to users. This step focuses exclusively on gallery-specific settings, such as layout, transitions, navigation, autoplay, and display options.
| Feature | Options |
|---|---|
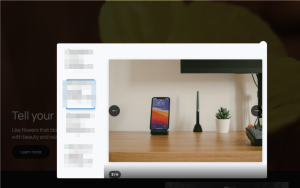
| Thumbnail Position | Top, Bottom, Left, Right |
| Thumbnail Size | Small (80px), Medium (120px), Large (160px) |
| Navigation Arrows | Show / Hide |
| Image Counter | Show / Hide |
| Captions | Enable / Disable |
| Auto-Play | On / Off, 1–10 seconds interval |
| Transition Effect | Fade, Slide, Zoom |
| Lightbox Mode | Enabled / Disabled |
Step 5: Publish and Preview
Once everything is configured:
- Click the “Publish” button in the top-right corner.
- Use “Preview” to test your popup on a live simulation.
- Confirm your trigger works and that the gallery displays correctly.
- Visit your site as a visitor to test real-world behavior.
✅ Final Checklist Before Publishing:
- License activated
- All images properly uploaded and optimized
- Trigger method tested and working
- Targeting and conditions configured
Best Practices for Publishing Image Gallery Popups
- Optimize for Speed: Use compressed and resized images.
- Limit Gallery Size: Keep galleries under 20 images for better performance.
- Use Descriptive Captions: Improve storytelling and accessibility.
- Test Across Devices: Preview on desktop, tablet, and mobile.
- Use Smart Triggers: Don’t overwhelm visitors—use scroll or exit intent strategically.
With the Image Gallery Popup feature in Instant Popup Builder, you can:
- Display visual content in a non-intrusive, modern popup
- Customize layout, transitions, and behavior
- Target specific users, pages, or conditions
- Optimize for speed, engagement, and user experience
This step-by-step guide equips you with everything needed to create, configure, and publish a fully functional image gallery popup that enhances your WordPress website.